Category Archives: Jo

The importance of “other” creative outlets.

by Joanna Mueller

As some of you may know, I don’t torch much during the winter months.  My studio is located in my garage, however, is taken down during winter months due to weather.  I depend on open torch nights at my friend’s studio to get some things done during the winter (thanks Mari!!!).  I’ve gotten bored.  Very bored.  It was time to pick up one of my old habbits…. ACEOs.  If you’re not familiar with the term, ACEO stands for Art Card, Editions, Originals.  They are specifically miniature art pieces that measure 2.5 x 3.5 and are usually created on heavy duty stock watercolor paper, small canvas, etc., and sold.  ATC is something different in that ATC is traded, not sold.   Some are drawn, some are painted, some are decoupaged, but all are fun!  I think it’s so very important to have a creative outlet other than my glasswork.  If I didn’t, I would have a very long, boring winter, and probably end up pretty cranky.  I thought I’d share some of my work here.  I love drawing and painting fairies and fantasy, but also love flowers and landscapes.  I tend to lean toward color pencil and watercolor, although have been known to work with acrylics and other mixed media such as chalk and pastels.  I hope you enjoy looking at them.  There is a huge following of ACEOs on ebay.  Just go to ebay and put ACEO in the search bar and you’ll see what I mean… all styles, something for everyone.    I sell mine on ebay, and also give them as gifts.  Here’s a sample of my work, and as always, thanks for looking!

Stargazer

Woodland Sprite

 Fire Nymph

Beaded Car Freshener Tutorial. Another use for your lampwork beads!

By: Joanna Mueller

……and yet another use for your lovely lampwork beads!  Add it to your list of quick gifts, and table fillers for craft shows.  These babies move!  You can either sell them as kits for other people to make and give… or you can put them out already made.  Either way, your car will not only smell great, but be adorned with our first love… BEADS!

Step 1:  Make dangles.  Use whatever beads you want and string them on headpins, loop the top and set aside.

image1.jpg

Step 2:  Pick a focal bead and string onto a headpin. Loop at BOTH ends.  You can design this part any way you want. Use whatever focal you want to and use whatever accent beads appeal to you.

 image2.jpg  

Step 3:  It’s time to put everything (beads) together.  First, attach a split ring to the bottom loop of your focal piece.  Then, place all dangles onto that split ring and let them hang down.  You will also need to attach a split ring at the top of your focal piece at this point. 

 image3.jpg

Step 4:  It’s time to attach the lanyard hook to the auto air freshener.After you do that, you will need to also attach that same lanyard hook to the split ring you just put on step 3 (at the bottom of the bead hanger)  (the dangles help cover the lanyard)

image4.jpg

  image5.jpg  

Step 5:  You are finished…  Hang it in your car, or wrap gently in a box with tissue paper for a wonderful stocking stuffer gift.  ENJOY!

image6.jpg  image7.jpg   

Ways to use your lampwork beads…

Greetings fellow beaders.  Well, if you’re anything like me, you may often get a creative block and become bored making the same ‘ol thing with your (or others) lampwork beads.  Here’s a quick make that is a wonderful gift for someone, or for yourself.  The best part is that you can add as many or less beads you want to.  I found these ribbon clamps at a general crafting store. Maybe Michaels or Hobby Lobby.  I try to make the bookmarks long enough for someone to use in a large book or a small paperback, but you can make them whatever size you want.  Remember, they’ll be hanging through a book, so you don’t want to weigh them down too heavily.   Run to the craft or fabric store (you know you want to) and walk directly to their sale bin… you can ALWAYS find pretty ribbons and things in the sale bin!  By simply attaching a couple of ribbon crimps to the ends of your cut ribbon, you give yourself a new opportunity to hang beads— and who doesn’t like that?  The possibilities are endless, especially now-a-days when the ribbon varieties are very creative and colorful.  There are dog bones and princesses, smiley faces and hearts, flowers and stripes.  A bookmark for every season, perhaps.  Here’s a pic, I think it’s pretty self explanitory.  Like I said, a quick gift is always needed, and a quick sale is even better.  These make awesome space fillers for shows!  Now go. Have fun!

Sleekbeads “Animalistic Bookmark”

Boro Leaf Tutorial

By: Joanna Mueller 

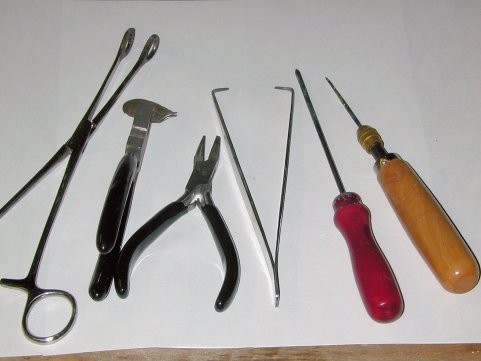
The easiest part of this process is making the loop first.  Consider it a tutorial in “reverse”.  When I am creating delicate items, I find it easier to make my loop first so as not to injur or mar the item when I’m attaching the loop.  I like to get all my tools ready prior to my bead making sessions.  It is important to me so that I am not searching for something I really need within reach.   See tools below for an idea of what you will need to complete this Boro Leaf Pendant project.  Leaf Masher, Peter’s Tweezers, Tungsten Picks, Long Looped Hemostats, TweezersClear boro punty,   Tan Silver Creek,  Amber Purple

And never forget your boro shades and good ventilation!

tools.jpg

Step 1 Take a rod of Amber Purple and melt and wrap it around about 2 inches of the end of a Tan Silver Creek Rod.  When wrapping color on color, keep the base color cool and the wrapping color molten until your rotations are completed and you finish off the end with the Amber Purple.
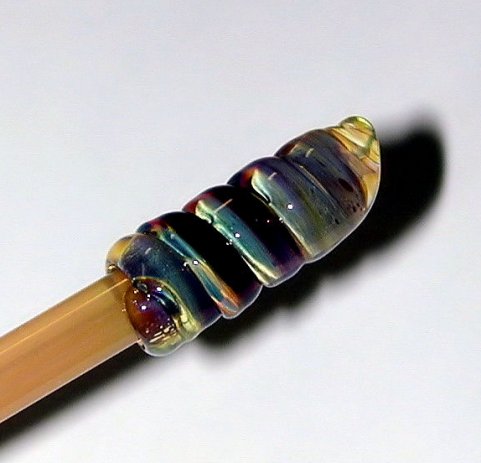
 15.jpg

Step 2

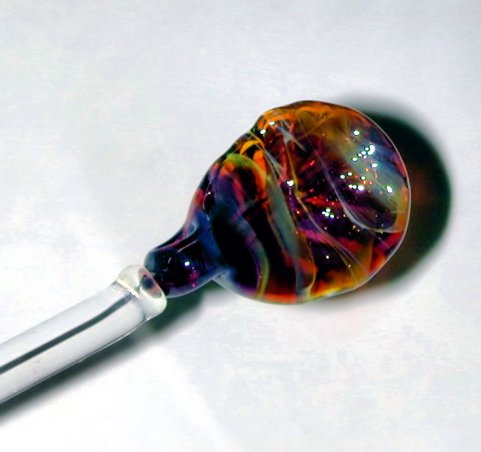
You now have a rod of Tan Silver Creek with 2 inches of the end covered in Amber Purple.  Melt the tip of the rod in the flame until you have the shape of a small sphere/ball.

 21.jpg

Step 3Use your Peter’s Tweezers to “poke” through the center of the sphere/ball, then proceed to heat your tungsten pick in the flame and gently push your pick through the hole.  Continue this process until you are happy with your loop.  If you’ve never done this before, just keep practicing, it will become more easy with time.  Many people have trouble making loops after their item is made and shaped, so this tutorial is backwards in that you make the loop first!


 31.jpg


 Step 4

It’s time to punty your clear boro rod to the tip of your loop.   Once your punty is set, flip it around and place the color rod in the flame right at the end of where the Amber Purple is wrapping around.  Burn off remaining Tan Silver Creek Rod.

41.jpg 

51.jpg

Step 5

Hold your clear boro punty down at your work surface and tilt the color piece up into the flame.  Rotate the color piece constantly in the flame to avoid drooping or dripping.  Melt down the color piece into one nice plump ball.   It is important that you watch your flame here as you do not want to  melt the piece/ball into the loop you just made.  Remember to keep the loop out of the flame.  Once all the wrapping has melted nicely into a ball/lump, slowly lift your boro punty up and let the color boro piece droop down a little to make an elongated oval shape.

61.jpg


Step 6

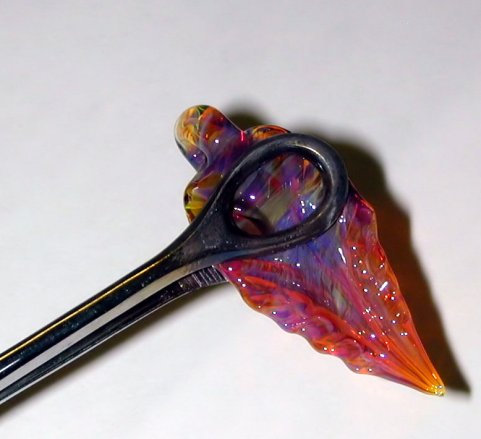
While your elongated oval shape is still quite hot/glowing, pick up your leaf mashers and gently mash the ball of glass.  Remember, do not heat your loop end too much and definitely do not allow any of the loop area to get between your leaf masher.


71.jpg

Step 7

Now it’s time to really shape your leaf.  You will use heat control for this step and it is important not to overheat any one area too much.  Heat the mid-section of your boro leaf gently without superheating the tip of your leaf.   Once you have a nice even light glow to that mid-section, take your tweezers and gently pull out the tip of your leaf.  You will immediately see your leaf start to take shape.  Shape to your desired look.  Once shaped, heat one side of the leaf and use your tweezers to squeeze a few spots along the edge.  As you move down the edge of the leaf, rotate your tweezer tips toward the loop.  This will make the tweezer indentations look more natural.  Give one final tweezer squeeze right at the tip of the leaf to finish off the shape.

81.jpg

Step 8

I like my leaves to have a slight curve to them. It looks more natural.  Heat one edge of your leaf in the flame lightly. You don’t want your glass to get soupy at this point, just an even light glow.  Once the glass begins to glow, take out of the flame and press slightly on a marver to push the edges of the leaves upward slightly. Repeat on opposite edge.

91.jpg 101.jpg 

Step 9

Time to break off that punty.  To do so, take your long looped hemostats and gently grab your leaf by it’s mid-section, closer to the loop than the tip.  You never want to grab your leaf at the tip or you have a good chance of breaking your leaf into pieces.  Gently tap punty and break off at loop.  Now you need to melt in any spots left by the punty and shape slighty and slowly. Do not melt your loop too hot.  Once you have done this, Lay your leaf down on your marver and pick up with the hemostats again at the loop end.  Now flame-strike your piece and fire polish afterward.  Pop into the kiln.
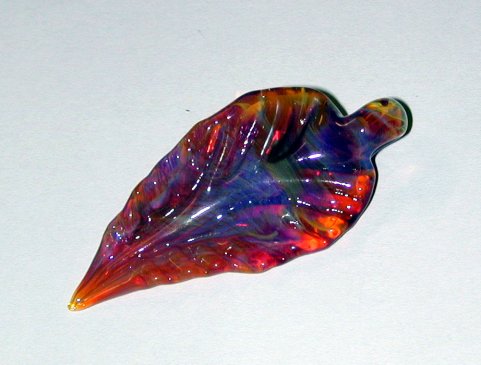
 111.jpg

121.jpg

131.jpg

CONGRATULATIONS!

You just made a boro leaf pendant! Congratulations!

141.jpg