
This is a brief overview of needle felting and not intended to be a definitive guide. Needle felting is easy to learn and relaxing to do while watching TV. Give it a try, I think you will love it too!
Needle felting is a “dry” from of felting. The fibers of the wool become entangled as a needle is passed repetitively through the wool. The needles have small barbs on their edges that catch the fibers and draw them downward into the other fibers as the needle is pushed down. As the needle is drawn upward, the fibers are left behind entangled in the others. Needle felting is ideal for sculpture. The wool can be felted so heavily as to be self supporting. On very large objects, a wire armature can be added for support.
Besides sculpture, needle felting is also very useful on flat surfaces. The flat piece can be made entirely by needle felting, or embellishments can be added to a piece that was previously wet felted.
Very few supplies are needed to needle felt: wool, felting needles and a foam pad
Wool – Not all wool felts the same! Just as curly hair and straight hair style differently, the fleece from each breed of sheep has unique characteristics. Wools that work well for wet felting, like Merino, do not work as well for needle felting. Basically, if you pull the fibers from the roving and it comes off in very long fine straight pieces, it will not needle felt as easily as fibers that are shorter and pull off more as a mass. The fine straight fibers can be used successfully as decorative fibers however. My favorite breed for needle felting is Romney. It felts fast and leaves few punch holes. All wool will felt, some varieties just take longer than others. I purchase my wool already dyed.
Felting Needles – These needles have been used for years in the commercial production of wool. They are available in different sizes and shapes: star and triangle. The needles have very small barbs on the edges that catch fibers as they are pushed down through the wool. The star shaped needles have more edges and therefore, more barbs. It is important to have several sizes of needles because they each have their own purpose. The smaller the number, the larger the needle.
This is how I like to use mine:
36 triangle – since the barbs are larger, they catch more fibers with each push. Use to attach parts and also useful at the very beginning of the felting process when the fibers still have a lot of fluff.
38 triangle – used for the bulk of general felting.
38 star – can be used for general felting, but I like to use it to refine the piece and add detail. Great to use along the outside of the piece to help felt in stray fibers.
40 triangle – switch to this needle when it seems like the 38 triangle is pushing too many fibers or when the detail you are adding is very fine.
42 triangle – used for the very finest of detail work. I find this size very useful when working on the details of eyes.
Needles are VERY sharp, please use care. I find it helpful to color code the bent end of the needle. Some needles come already color coded. A small piece of colored electrical tape works well for me.
One company sells a much larger variety of felting needles, but in general the ones listed above are all commonly available.
Foam – the foam is used as a work surface. As the needle goes through the wool, the sharp end lands in the foam. Do not poke too far into the foam, or the fibers will get buried in the foam and be felted to it. Blocks of foam are sold specially for needle felting. You can use foam intended for chair pads, but it needs to be about 2” thick and have good density.
Needle holder – many different types are sold. They hold several needles at once so each poking motion yields greater results. They are useful when needle felting large areas. I rarely use mine with the type of sculptural felting I do. I do use it when doing background for a piece, or when adding embellishments to a wet felted scarf.
How to use the felting needle – most of the time the needle will go straight in and straight out of the felt. However, when working on an edge (like the edge of a flower petal) you many need to work at an angle. No mater what the angle, the needle should always come out the same way it went in to avoid bending or breaking the needle. You can also use a star needle almost parallel to the surface to “clean up” the piece by felting in the stray fibers. I hold the needle between my thumb and index and middle finger. A light repetitive motion is used.
Tips
– As you work the piece, flip it over and needle the other side so it felts evenly and doesn’t get too attached to the foam.
-When making pieces that need to get attached, do not completely felt the area that will be attached. The join will be more durable if there are loose fibers to felt together. For example, on a flower petal, leave the bottom of the petal somewhat unfelted .
-Colors can easily be layered or blended.
-When adding more felt to an area, if the edges of the piece being added are loose, they will felt in to the main piece better without showing an unwanted line.
-Remember your piece will shrink quite a bit as it is being felted, but it will become thicker and sturdier.
-If you are making a large piece, you can use a cheaper undyed wool in the center and cover it with color. I do this when making heads and bodies.
-As you felt, colored fibers from the front will begin to show on the back of a thin piece. When you felt the back, if you don’t want some of the fibers from the back going through to the front, you can felt using a star needle and a more parallel angle. Remember the fibers follow the needle.
I love to make faces. These are all works in progress as you can tell from the wires coming through Santa’s head. All of the detail has been achieved by adding different colors of felt.

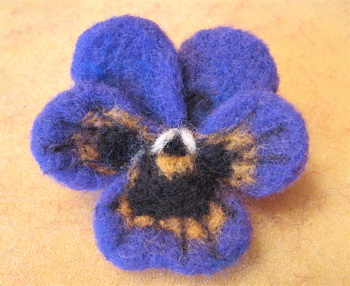
If you would like a free tutorial, I have posted one to make this pansy.


Awesome information, Kathy! Thank you!
I have tried felting and it is fun and relaxing. I need to get my felting kit out and do it again, you’ve inspired me!
Lovely blog! You have covered so many details! That is really helpful. I just started a blog concerning needle felting. Have you been felting very long?
How do I needle felt roving on wool that has not been felted? I design and sew handbags and want to try decorating the wool bags. Do I felt the front then turn and felt from the backside, using the foam block again? Thanks, Jan
Kathy, your faces are amazing! So much detail!! Thanks for the article, it’s very informative.
I’ve been milking the net for information on this sculpture technique. Your info is some of the clearest and most personable out there. It’s funny how so many people who know how to do things can’t seem to speak clearly about the basics. I very much appreciate your clarity.
hello,
your faces are awesome !!!
greetings from Belgium
Inge
oh i so want to be your apprentice!!!!!!! I love felting but i am not that good!
I love the pansy, but i so want to be able to do 3D shapes eg a little dog or cat.