
Sometimes when making a piece of jewelry the hole of the bead being used is too large for the diameter of the wire and the bead feels wobbly. The easiest way to fix this problem is to fill the hole with small beads that will fit over the wire, but fill the space. However, this fix does not always work because sometimes I just don’t have the right size filler beads. One day out of frustration I came up with this solution.
Supplies:Craft foam (this is the colored foam that comes in sheets and is available anywhere crafts are sold)
Fine nose scissors
Large pin (the type that florists use on corsages work well)
Step 1: Cut a small piece of foam. Poke hole in center and thread onto wire.

Step 2: Use the fine nose scissors to clip the foam into a circular shape. It needs to be larger than the hole being filled, but not by much.

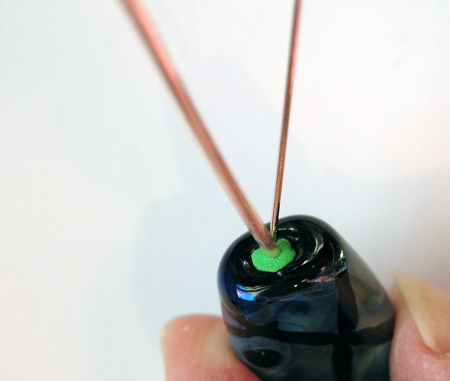
Step 3: Position the bead on the wire and use the pin to start forcing the foam down into the hole.

This is just another photo that shows the foam being forced into the hole. Work it a little at a time.
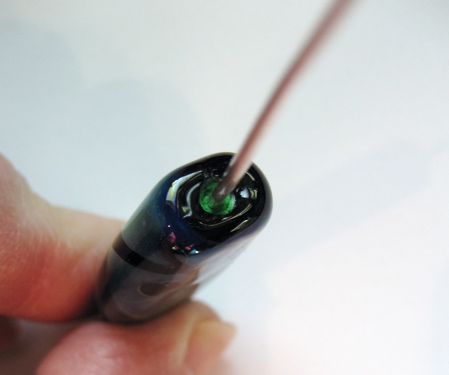
Step 4: Push the foam down far enough that it will not show at the top of the bead. You also want it down far enough that it won’t work out of the hole with wear.
That’s the basic idea. If you need to have a large bead filled both at the top and the bottom, put a piece of foam on the headpin first, then the bead. You may not be able to work the foam in the bottom if the bead is too low, so position the bead as low as you can and still get the foam in. Then after the foam is inserted, lower the bead into it’s final position. At that point, you can fill the top of the bead as described above.
I’ve found it doesn’t matter what color foam I use if I am covering the bead hole completely with spacers or wire wrapping. If you think your spacers are not large enough to cover the hole, you may want to be more careful on color selection. Honestly I’ve used green because that was sitting on my workbench from another project and I didn’t take the time to go searching for a different color.
One of the great things about this method is how adaptable it is, and cheap too! Hope it works for you.


Wonderful, novel tip!
Excellent! I’ve got a ton of that stuff somewhere. Probably enough for all the bead world to use it for this!
This is a great tip, thanks Kathy! I will show this to Brooke… she often wires focals for customers!
Great solution!
Who’dathunkit? What a terrific tip! Thanks for sharing! Dang, girl, that creativity just keeps ‘a flowin’!
Great solution Kathy, Thanks!
That is so cleaver! Love the idea, thanks for a wonderful tutorial!
What an awesome tip- now no more threading those teensy seed beads that don’t always have a hole big enough onto headpins. You rock!
This IS a nice tip! I submitted that tip for using smaller beads to Bead & Button magazine years ago, but I always worried that the torque of the beads inside could crack a fragile big bead. This would be a nicer cushioning technique.
Thanks for sharing!
Hey, that’s my necklace piece 🙂 How cool!
WOw, a much easier solution than praying I can find a small enough seed bead. Many Thanks,
Tammy
Thanks! Your photos are so nice and clear, it makes it easy to follow.
~Johanna~
I am sure going to try this. Thanks
Great tip!! Thanks for sharing!